Showing posts with label video. Show all posts

2014 Seattle RV Show in Seahawks Territory


On Saturday I made a run over to Seattle to the annual Seattle RV Show. Just days after an estimated 700 thousand Seahawks fans converged on the city for the Super Bowl victory ceremony, Centurylink Field was hosting the 2014 Seattle RV Show. 
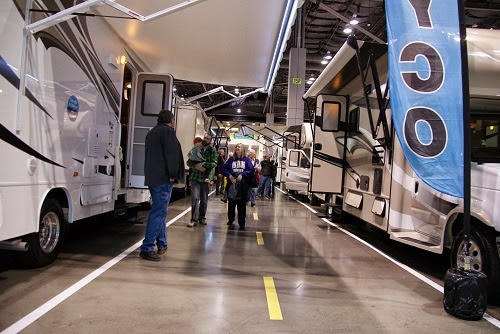

I could still feel the Seahawks fever in the air. Some dealers were even offering Super Bowl specials. Here are some highlights from my RV show adventure:


After sleeping in, I took the ferry from Bainbridge Island over to Seattle. It was below freezing outside but a beautiful day. I couldn't resist spending the 30 minute ride outside taking pictures and shooting some video while the rest of the passengers remained inside staying warm.

A look ahead at Seattle and the Cascade Mountains

Looking back at Bainbridge Island and the Olympic Mountains
When I arrived at Centurylink field, I payed my $12 for a ticket and started my journey through the many, many, many RVs, trailers, campers, and RV stuff. There were so many RVs this year in multiple rooms, that I found it very difficult to get my bearings at first. I tossed the show map I was given at the door because I didn't think I'd need it. Turns out I needed it several times. After a while I figured out the lay of the land and started touring rigs...one section at a time.  Check out my video for a recap.

I also picked a couple seminars to attend. My favorite was the show director himself sharing tips on boondocking. I learned a few things that got me excited to come home and plan a boondocking adventure of my own. I'll have to put some of those tips together in a future post. Keep an eye out for that.

The show organizers promised a "Bigger and Better" show this year and they certainly delivered. I couldn't even see everything. After about five hours I was exhausted. It was time to head back to the ferry before darkness set in.

If you are in the market to buy, I recommend attending an RV show near you. You will be able to comparison shop and tour many RVs under one roof. As a bonus, most dealers offer RV show discount pricing. So save yourself the headache, time and gas driving all over the place to find the right RV for you. Go to an RV show first. You'll enjoy it.

Have you attended an RV show this year? What was your favorite RV?

Read full article »

Port Townsend Film Festival - A Great Getaway


It is so nice to pack up the RV and escape for an extended weekend. Am I right? Sure you could catch up on some yard work, but I prefer plan B. When Friday comes, I tell my boss that I've got to leave work a little early because I'm heading out of town. "Where will you go this time" he says. I explain "We're heading to a film festival with friends. So excited!"

Each night you can enjoy a family movie in the street in front of the Rose Theater
Last fall, we did just that. About an hour from our home in Washington is the lovely historic city of Port Townsend. Throughout the year Port Townsend hosts several festivals. Our favorite is the annual Port Townsend Film Festival.  Since 2000 the annual festival has attracted film lovers from around to region and from afar. This last year, there were over 50 documentaries, features and shorts presented in five venues around town. They even close off a downtown street in front of the Rose Theater for three days. The PTFF motto is "A film lover's block party celebrating films and film makers."

For the last few years we've taken our RV to Port Townsend for the film festival and have had a blast each time. Enjoy this video from our last visit.


If you are looking for something different to do in your RV, search your nearby towns and attractions for cool stuff like this. We have found this to be a great way to experience a new place. Try all the restaurants, browse the shops and hang with the locals. Who knows, you may find new home away from home.

Learn more about Port Townsend, WA festivals and events. We stumbled upon the Kinetic Skulpture Race a few years ago. There was strange crazy cool stuff going on there.

If in Port Townsend I recommend you book a reservation at nearby Fort Worden State Park. Fort Worden is one of our favorite places. Enjoy!

What are your favorite cool weekend getaways?
How about a music festivals, beer festivals, wine tour?

Read full article »

LED Light Bulb Comparison


Walk through the light bulb section of Home Depot these days and you're likely to see more LED replacement bulbs for your home lighting fixtures. Though expensive, the claims are that they use very little electricity and that you'll probably never need to replace them. So let's see. 
The Battle of the Bulb
Most of us already know that LED bulbs use much less electricity than traditional bulbs and that they last forever. I wanted to run my own test. I decided to replace the bulbs in my RV light fixtures with LEDs. During that project I ran this comparison to see exactly how much more efficient my LED replacement bulbs were over the original incandescent bulbs.


Are you thinking of replacing your bulbs with LED bulbs? Event if you just replace a few, it's probably worth the expense and it's very easy to do. I picked up my bulbs from Amazon. Here are some quick links (below) if you want to check them out for yourself.


I used this 9 LED bulb in my RV for about $7 each (I needed about 16 of them).


I later found these that come in a 2 pack for around $12.

If you try this out on your RV, leave a comment. Do you like the result? How much power do you think you've saved?

Read full article »

Funny Friday: Go RVing Skit aired on Jimmy Kimmel


"Hey Bro!"
Who ever thought RVing and streaking would go together.


This funny GoRVing skit was on Jimmy Kimmel Live this week. Happy tailgating. Enjoy!


Read full article »

RV Roof Gets Cleaned - 11 Foot 8 Inch Railroad Trestle Wins Everytime


With an 11 foot 8 inch clearance, this train trestle in North Carolina has claimed many a truck and a few RVs. So many in fact that it has it's own website 11Foot8.com. 


Check out this video (below). The roof of this fifth wheel just clears the trestle. Unfortunately everything attached to the roof (antenna, vent covers and air conditioner) gets left behind. Oops! Like many many others, this guy didn't read the sign.


I guess I don't even need to say it, but I will anyway. 
Lesson #1: Know your clearance and watch the signs. 
I sure hope I'm paying attention if I ever drive up to an overpass like this one. Yikes!

Do you want more? Click here for a full 5 minutes of trucks testing the clearance on this trestle...and losing.
Read full article »

RV Camping at Fort Worden


This last weekend we took the RV out to Fort Worden in Port Townsend, WA. Here's a little video tour of historic Fort Worden I made while we were there. Oh yes, we also discovered a little furry visitor in the rig.


We arrived at dusk and met up with family and friends for a nice campfire


 Saturday was the best day. I climbed up on the roof to see how my solar panel was doing. Going strong. 


It was still a little cool in the mid 40s, but it felt great absorbing some sun


I made it out for a run and found a trail that led me to this great lookout. This is looking towards Whidbey Island and the Northern Cascade Mountains. So awesome!!!


(Below) Looking in the other direction (West) along Northern Washington Coastline


The weekend seemed to go by so fast. We all could have used just one more day there to relax and enjoy the park. It is one of our favorite local places to visit. You should check it out if your in our neck of the woods.

Check out more pictures of Fort Worden that I took on a previous trip.


Read full article »

Tending To My RV Over the Winter


These are the darkest, wettest and coldest months up here in the Northwest. So to keep my RV happy I've got her covered up.

By no means does this mean that I neglect my RV throughout the winter. I take the opportunity to check on things from time to time. Today just happens to be one of those days.

Starting the generator regularly over the winter
Running In Place
Every couple of weeks, I head out to the RV and  check on things. I keep a couple of space heaters running inside to keep the inside temperature from getting too cold. At least once a month, I fire up the generator and also start the engine for a while to get the oil circulating. With the generator running, I turn on my water heater and a space heater to give the generator something to do besides idle.

Start the engine and let it run
When I start my RV engine, I let it get up to normal operating temperature then rev it at 2000 RPM for a few seconds. before shutting it down.

I've found that both my E450 engine and generator are happier if I run them on a regular schedule, especially when it's parked for long periods of time.

My Batter Tender hooked to my
chassis battery
Giving the Battery A Trickle Charge
I also have a Battery Tender hooked up to my chassis battery throughout the winter. This handy little device monitors the battery voltage and keeps it charged at 13 volts applying a trickle charge as needed.

I highly recommend getting one one of these if you don't have one already. They are not spendy. I just keep it plugged in inside the coach and run the cable out to the battery terminals in the engine compartment. 

Get Those Moving Parts Moving
The best way to keep your RV in good shape over the winter is to use it. If you can, go out for a little drive. It's great to get all of the moving parts of your RV moving. It's also great for your tires to not sit in the same spot for long periods of time.

Got Power? Can You Say Yard Camping?
The bottom line: I just like spending time in the RV, even when it's parked in my yard. Watch a movie, listen to music, or do some yard camping.

Take time out to care for your RV over the winter and it will be in great shape to hit the road when you're ready.

Want More Winter RV Care Tips?
Here's a video with more winter RV care tips

How do you use your RV in the winter? Leave a comment. 

Read full article »

Cool Aussie Off Road Trailer


Nobody does rugged like the Aussies do. If you own an RV (I'm sorry Caravan) in Australia, odds are it's smaller and a lot tougher than what we are accustomed to here in the U.S.

This relatively small UEV 490 Trailer from Conqueror Australia is like the Swiss Army Knife of Trailers. Why do I like this kind of stuff? Hell, if you've ever been into forts, tree houses, erector sets, survival you're gonna love this too. Check it out.

Read full article »

70s Winnebago Sesame Street Video


I love this vintage 70s film from Sesame Street. Is this guy flying around in his Winnebago...or did they speed the film up? I love how the kids pop out of nowhere when they pull in to the parking lot campground...kind a freaky!

"I live in a motorhome"


Anybody grow up with one of these? Leave a comment.


Read full article »

Towing a car behind your RV


Traveling around in your RV is a wonderful liberating experience. Also liberating is having the freedom and convenience of a car to get you around town or to nearby attractions once you've reached your destination. Plus there are places that your RV just can't go. That's why you will seldom see us without a car in tow.

Our RV and CRV Toad at Yellowstone
I get asked a lot by friends or beginning RVers how this whole "towing your car" thing works. We'll I use the four wheels on road method which requires a tow bar setup. Here's a video to show you how I connect and disconnect my tow vehicle.


RV Speak
Now this is important. If you don't want to sound like an RV newby, you'll have to learn to use the correct RV towing lingo.
  1. Be sure to refer to your tow vehicle as your "Toad" or "Dinghy"
  2. A "Dolly" is not something you play with. It's like a trailer that lifts the front two tires off the ground and leaves the rear tires on the ground
Can your car be towed?
Certain makes and models of cars are designed to be towed and some are not. If your's is in the "not" category, then you need additional equipment installed first. Your car's owner's manual should have a section about towing if it is designed to be towed. There is also a list of vehicles in the 2011 Dinghy Towing Guide (PDF). Finally, check your RV's towing capacity. My RV can tow up to 5000 lbs.

What Equipment Do I Have?
My tow vehicle is a 2004 Honda CRV and the equipment I use is:
Is it expensive?
Configurations vary, but plan on spending around $2000 to $3000 to get a quality towing setup (car not included...of course).

Does towing affect my gas mileage?
Yes. I drop about a mile or two in MPG when towing versus not towing.

Good luck! Once you're setup to tow your car, you won't want to leave home without it. Enjoy.
Read full article »

I don't have an RV garage, I have an RV cover


Do you keep your RV in the garage? If you do, then that's pretty cool. I, on the other hand, don't have a roof over my RV. So the best way I've found to keep my RV protected from the elements is to keep it covered with a quality RV cover.

I was recently asked by Empire Covers to review their new RV cover. Within a week I received the cover at my door. The first thing I noticed was that it was smaller and lighter than expected. Some covers can be bulky and hard to handle, but not this one. This got me excited to unpack it and try it out.

February 2012
Win a FREE RV Cover from EmpireCovers.com

Check out the video below for my review:


Pros
I've used the cover for a couple of weeks now and I have to say that I really like it and would recommend it for your RV. Here's why:
Reflectors on the front/back
  • It fits my RV better than my previous cover
  • It's light and compact which makes it easy to store and handle (about 1/2 the bulk of my other cover)
  • The elastic in the front and rear hold it in place right away without having to tie it down
  • Installation and removal is easy which means I can put it on more often
  • It has yellow reflectors sewn into the front and rear to keep your guests (or kids) from driving into it at night
  • And, it comes with a 5 year warranty. 
Cons
I couldn't find anything negative to say about the cover itself. The only marginal feedback I would have has to do with the installation instructions. It comes with one piece of paper that includes the warranty and instructions. The instructions are clearly for the car cover they sell and not the RV cover. With that said, it is pretty easy to figure out once you've unpacked it (as seen in the video).

Tip for removing, storing and installing your RV cover
To remove the cover from your RV, start by lifting up the back and sides, fold them towards the middle, and continue folding from the outside in until the cover is the width of the storage bag. Then start folding (or rolling) towards the front of the roof before putting the cover in the bag. If you do this, then installation is easy. To re-install the cover, just place it on the front of your roof and unroll it towards the back and drop the sides. 

My RV Cover quick tips

  • Wash your RV before you cover it, because it's always nice to unwrap a nice shiny RV
  • If possible, wait until it is dry before you cover your RV
  • Remove or cover any sharp objects on your roof or sides such as solar panels, antennas, etc.
  • It's much easier to tie a rope to the bag and lift it up to the roof instead of trying to carry it up the ladder with one hand
  • When walking around the roof during the installation, be careful where you step
  • You can start your RV's engine or run your generator when covered, but make sure the cover is not covering or near any exhaust pipes
  • If you run your gas heater, be sure the cover is not covering the hot air heater vent as it will burn a hole through your new cover
  • Finally, make sure you unzip any necessary side panels before expanding any slides.
So there you have it. Keep your RV looking as good as new with a new RV cover. It is worth the investment and a "must have" for me.

To find an RV cover designed for your RV, I recommend you visit EmpireCovers.com first.

Read full article »

A Camping Trip Put to Music


So what do you do with all of that video footage from your RV trip? Well if you're Grant Woolard, you'll put it to song. Here's Grant's "Camping Song" that he just sent me to share. It's compiled from video clips and sound bites recorded on a recent RV trip to the Pacific Northwest. And...it ends like every RV trip ends...you'll see.


To see more of Grant's videos check him out on YouTube.

Have you got a funny video or picture to share? Send it to me. If there's a story...then tell it.

Happy RVing!

~Tito
Read full article »

RV Suspension Upgrade Part 2 - Installing Rear Anti Sway Bars and Bilstein Shocks


Back in May I started a project to upgrade the suspension on my Class-C motor home. I purchased heavy duty upgraded anti-sway bars from Hellwig and replacement Bilstein shocks. I decided to do the anti-sway bar installation myself and managed to get it done without doing any damage to myself or my RV. Did you see my post from May? If not, here's a link.

In part one I covered the replacement of my front anti-sway bars. My plan was to shortly follow that up with "Part II" of the series that would cover the replacement of the rear anti-sway bars. If you have been following my blog, then you know that didn't happen. As it turns out, I finished the project a couple of months ago but haven't had the time to tell you about it. Truth be known, I just haven't had the time to edit the video and post it to YouTube. Why? Well here's my excuse. This year, I decided to run a marathon and, frankly, the training is "taking over my life!" But hey, two months later...I've finally finished the video!


I'm so glad I did this install, and the results have been remarkable. Unless you are the driver of your RV, it's hard to explain the difference the upgrade makes. Before...when the RV handling was not good...I would have to remain calm and collected behind the wheel in order not to alarm the rest of my family. While my family continued to enjoy the ride, I might be "white knuckling" it a bit as cross winds toss the RV around, or semi-trucks go speeding by, or while uneven roads cause the RV to shift from side to side. This suspension upgrade minimizes much of that affect and has changed the whole RV driving experience for me. As if I didn't enjoy driving the RV before...now it's much more relaxing.

For details on what I did, check out part 1 and part 2 of the videos I put together. 

Finally, here are some links to the vendors I utilized for the upgrade:
If you're planning on keeping your RV for a while, then I highly recommend this upgrade. It's worth the investment and you'll feel safer and more in control behind the wheel. 

~Tito

Read full article »

Living Small - RVers can you relate?


Jay Shafer lives in a tiny 8ft x 12ft house. He has learned to live with less and now designs and builds tiny houses for a living. Oh, did I mention, that his house has wheels. Sounds familiar right? I have to admit, his little house has some appeal to me.

Read full article »

RV Suspension Upgrade Part 1 - How to install Hellwig anti sway bars


So what happens when you put a 30+ foot house on a Ford truck chassis, then load it up with people, a generator, water, appliances, furniture, food to last a month, and other stuff? The result is an uneven heavy RV that doesn't handle very well. To accommodate the odd extra loads, the suspension and front tires have to work extra hard to keep the RV stable. This is especially true for longer class-c RVs such as mine.


I've found that many life-long RVers, who have owned multiple RVs, make it a priority to evaluate and improve the suspension components in their RV shortly after buying it. The stock shock absorbers, anti-sway bars and steering stabilizers can all be upgraded to heavy duty components that are better suited for the RV application. The results can be dramatic and make driving your RV a more pleasurable, relaxing and safer experience.


In part one of this two part video, I'll replace my RV's stock front anti-sway bar with a heavy duty upgrade. I chose to go with anti-sway bars from Hellwig for this project. There is no jacking up, drilling or special tools involved. I was able to complete the job using basic wrenches and ratchet hand tools. In a future video post I'll replace the rear anti-sway bar and have my shocks upgraded.

Keep reading: Part II of this project (Replacing the rear anti-sway bar)

Read full article »

Mini trip to Anacortes, WA and a visit to Deception Pass


Spring has been teasing us with an occasional burst of sunshine. Is winter finally behind us? Well not really. Nevertheless, we had plans to spend a long weekend in Anacortes, WA. Actually we had a motive. We took part in the annual 5 Mile Tulip Run. The Tulip Run is a popular event in the annual Skagit Valley Tulip Festival. So instead of a day trip, we of course packed up the RV and turned it into a little getaway. That's a no-brainer right?


It takes around 2.5 hours to make the drive North to Anacortes, but that is assuming that traffic conditions are perfect. Here's the problem. In order to get there we would have to take I-5 right through Tacoma, Seattle and Everett. If not timed perfectly, the 2.5 hour drive could end up being 5 hours. We have learned this lesson the hard way in the past, so this time I had a different plan.

The plan this time would be to pack up the RV early and leave the night before. This would enable us to bypass all work traffic through Seattle. So that's what we did and it worked. No traffic. We left at around 7:30PM and arrived in Anacortes promptly at 10PM. I love it when a plan comes together.

We had reservations at the Fidalgo Bay RV Resort for the following night so we needed a place to stay. I had previously scoped out a nearby casino and found out that they had an attached RV park. Perfect! I booked a pull-through site online at the Northern Lights Casino for only $22 for the night. We pulled in around 10PM and were all hooked up within 15 minutes. As it turns out there was a winter special which would have enabled us to stay the second night for free. That would have been great, but we already had plans. The park was quiet and all of the hookups were good. We definitely plan to stay there again.

The next morning we took advantage of the $2.99 early bird breakfast. I then made $28 back on the slots before leaving. So overall, you could say that I broke even. Perfect!

The next day we made our way 5 miles up the road to Fidalgo Bay which would be our home for the next three days. We got settled in before deciding the venture out see the town. It was only Friday and, amazingly enough, it was a really nice sunny day. I've been wanting to visit nearby Deception Pass so we head south to check it out.

Deception Pass
Deception Pass is a narrow waterway between Anacortes and Whidbey Island. We later learned that Deception Pass State Park is the most visited park in the state. We didn't know that.

Once we arrived at the Deception Pass bridge, we parked the car and took a stroll onto the bridge to check it out. Wow! The view from there was stunning. When we were leaving we found out that there was a jet boat tour that you could take through the pass. We purchased some tickets and rushed a couple of miles down the road to catch the boat. The boat tour and guides were outstanding and I highly recommend it. Check out the video footage at the top of this post.

Mt. Erie
While on the boat tour, the guide pointed out Mt. Erie to us. Not only is Mt. Erie the highest point in the area, but you can actually drive to the top. So after leaving Deception Pass, we decided to go find Mt. Erie. We weaved our way up the narrow one lane road to the top and parked. I can only say that the view from there was breathtaking. It was late in the afternoon at this point, perfect for pictures. We spent a good hour up there exploring the rocky ledges and taking tons of pictures.


We ended the day back at the RV fully satisfied and talking about what we saw. But it was time for bed, because the next morning, we were running the 5 mile Tulip Run.

Tulip Run
We woke up the next morning really tired. We got on our running gear, jumped in the car, and drove 10 miles down the road to the Skagit Valley Airport where the Tulip Run was about to start. When we arrived, the place was already packed, so we had to park pretty far away before checking in. The temperature was in the upper 40s but the wind was kicking up pretty good. At least it wasn't raining though. After getting signed in we lined up with 500 other runners ready to race. After a 3-2-1-Go! we were off. I came across the finish line 45 minutes later and rushed back to snap a picture of my wife coming across the finish. We received a nice Tulip and some food for our prize.

We enjoyed the next two days relaxing in the RV and exploring Anacortes. I even stopped at the Donut House in town that sold a blueberry fritter and a giant donut name the "Bigfoot" which was shaped like a foot. We returned home Monday and managed to avoid traffic once again by timing it just right.

It was a great little getaway. I can't wait to go back.

~T
Read full article »

Restringing RV Shades


I recently repaired two sets of day/night shades in my RV. Over the past year or so these two shades have been slowly wearing out. Once wearing starts, one side can start to droop or not stay up at all. What happens next is that one of the strings inside finally snaps. So what do you do when this happens? The solution is to restring the blinds.

Of course, you could find a window covering store to repair the shades, or you can restring the blinds yourself. As it turns out, this is a pretty low-cost repair should you attempt this yourself. But don't be afraid. I put together this video to show you that this is certainly something you can do yourself. Just be sure to check the string configuration before you disassemble your shades, and just take your time.


Before you start here's what you'll need

1. About 20 yards of 1.2mm or 1.4mm string (you can get it from your craft or fabric store or order online from fixmyblinds.com). The length you'll need will vary depend on the size of your window. So it's better to get more than you need. I got about 25 yards for around $7.
2. A flat head screw driver (to remove the plastic end caps)
3. Scissors (to cut the string)
4. Thin gauge wire or large fabric needle (for feeding the string through the blinds)

The diagram below (from fixmyblinds.com) illustrates the typical 4 string configuration that you'll probably find in your typical day/night shade.

When I took apart the wide upper bunk window shade, however, I discovered that the configuration was a little different from the standard size window I did first. On the wider window, there were two springs (one per side) and the 4 string threading was different. So be sure to inspect the string configuration to make sure you reassemble it correctly.

Standard Window (after)
Bunk Window (after)
So go ahead and give this project a shot. You'll be happy with the result and you're shades will operate just like new.

Good luck!

Read full article »

2011 Seattle RV Show


Hey RVers!

We recently checked out the 2011 RV Show in Seattle. There seemed to be much more travel trailers and fifth-wheels than class-a or class-c RVs. All in all we had a great time touring the RVs and hanging with our friends. Enjoy the video!

Read full article »

Winterizing and caring for your RV in cold weather


Here are some tips for those who park your RVs during the colder winter months. It's important not to neglect your RV when your not using it. Do I winterize? No. I don't feel the need to fully winterize my RV at this time of year because, in Western Washington, it does not normally stay below freezing for prolonged periods. You may have a different situation in your neck of the woods that may require you to winterize or face potential damage to your RV plumbing.

In either case, it's important to keep your RV happy during prolonged periods of non-use. Doing so will protect your investment and ensure that your rig is in good shape when you get back on the road.

Read full article »

How to handle a tire blow out in your RV


If you suddenly lose a tire driving down the road, do you know what to do? If you're thinking of slamming on the brakes, then think again.
This great video by Michelin shows you what to expect and exactly what you should do if this ever happens to you.
Read full article »
Related Posts Plugin for WordPress, Blogger...